We’ve had great success with our interactive emails using live Twitter feeds and hidden golden tickets to promote Litmus Live over the past couple of years. For Litmus Live 2017 we added a new twist—an interactive quiz inside the email. To “unlock” an entry and win a golden ticket, subscribers had to answer each of the five questions in the quiz correctly.
In case you missed it, here’s the email:
The interactive quiz is fully functional in Apple Mail, Outlook for Mac (2011 + 2016), and iOS Mail. Here’s what the interactive quiz looked like in those email clients:
We had a few requests from the email community asking how we created the email. Here’s a breakdown of how you can build your own interactive quiz in an email.
The Quiz
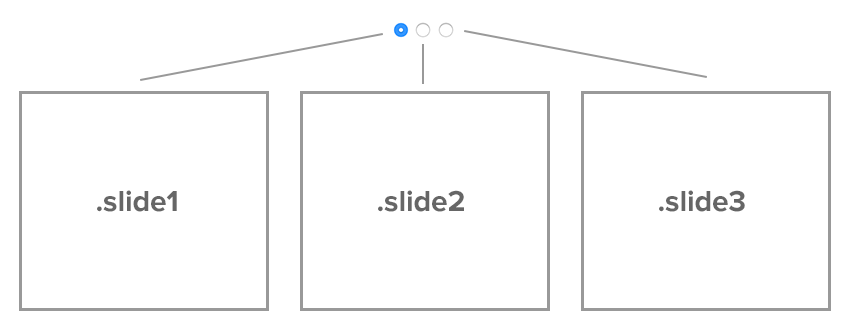
The concept for the structure of the quiz revolves around “slides” connected to radio buttons. Each “slide” in the quiz houses the content for a single question that is only visible when a player checks a radio button. Players simply move to the “next” slide after answering a correct question.
A Step-by-Step Guide Building Your Own Quiz
We built a stripped down, boilerplate quiz template for you to use and follow along with as we walk through how to build your own interactive email quiz:
1. Set up the radio buttons
At the top of the content section where the quiz is placed, there is a group of radio buttons:
<input type="radio" name="slide" id="one" checked>
<input type="radio" name="slide" id="two">
<input type="radio" name="slide" id="three">
Each input type is defined as type=”radio” so they can be seen as radio buttons. Use the same name attribute—name=”slide”—for each radio button so that they are associated as a group. Then, to make sure each button can be targeted, give each radio button a unique id and check the first “slide” to display by default with a checked attribute.
We’ll also want to hide the radio buttons by default using the following CSS:
input {
  display: none;
}
2. Connect the slides with radio buttons
Below the radio buttons, place the “slides” that will be associated with them.
<div class="wrapper">
  <div class="slide1">
    <!-- INSERT QUESTION #1 CONTENT HERE -->
  </div>
  <div class="slide2">
    <!-- INSERT QUESTION #2 CONTENT HERE -->
  </div>
  <div class="slide3">
    <!-- INSERT QUESTION #3 CONTENT HERE -->
  </div>
</div>
.slide1 corresponds to the radio button of id=”one” and should have the content for Question #1, .slide2 to id=”two” with Question #2, and so forth. The goal is to connect the content to a radio button so that it only displays when that radio button is checked. To make this happen, hide the slides’ divs by default, and only display them when their corresponding radio button is checked:
/* HIDE SLIDES BY DEFAULT, DISPLAY WHEN RADIO BUTTON IS CHECKED */
.slide1, .slide2, .slide3 {
	display: none;
}

#one:checked ~* .slide1, #two:checked ~* .slide2, #three:checked ~* .slide3 {
	display: block !important;
}
The next step is to create the HTML structure for a question.
3. Create the HTML Structure
To create a multiple choice question with only one correct answer, we will use another group of radio buttons. The easiest coding convention to follow is “label > input > content associated with that label,” and continue nesting labels until all of the questions are listed.
The HTML structure for our question with three possible answers will look like this:
<h1>Insert Question title here</h1>
<label>
  <input name="quiz">
  <!-- INSERT CONTENT FOR 1st LABEL (ANSWER) HERE -->
  <label>
    <input name="quiz">
    <!-- INSERT CONTENT FOR 2nd LABEL (ANSWER) HERE -->
    <label>
      <input name="quiz">
      <!-- INSERT CONTENT FOR 3rd LABEL (ANSWER) HERE -->
    </label>
  </label>
</label>
Each input has the same name (name=”quiz”) so they are associated as a group and only one can be true at a time.
Let’s fill this with some real content:
<h1>What is 1 + 1?</h1>
<label>
  <input name="quiz" class="wrong">
  <div>A) 1</div>
  <label>
    <input name="quiz" class="correct">
    <div>B) 2</div>
    <label>
      <input name="quiz" class="wrong">
      <div>C) 3</div>
    </label>
  </label>
</label>
In this example, the correct answer to “What is 1 + 1?” is B) 2. We will assign classes of .wrong to wrong answers and .correct to the correct answer to help us display success or error messages and styling.
4. Defining the success and error messages
Let’s add in success and error messages in the HTML:
<h1>What is 1 + 1?</h1>
<label>
<input name="quiz" class="wrong">
<div>A) 1</div>
<label>
<input name="quiz" class="correct">
<div>B) 2</div>
<label>
<input name="quiz" class="wrong">
<div>C) 3</div>
<div class="error">Try again!</div>
</label>
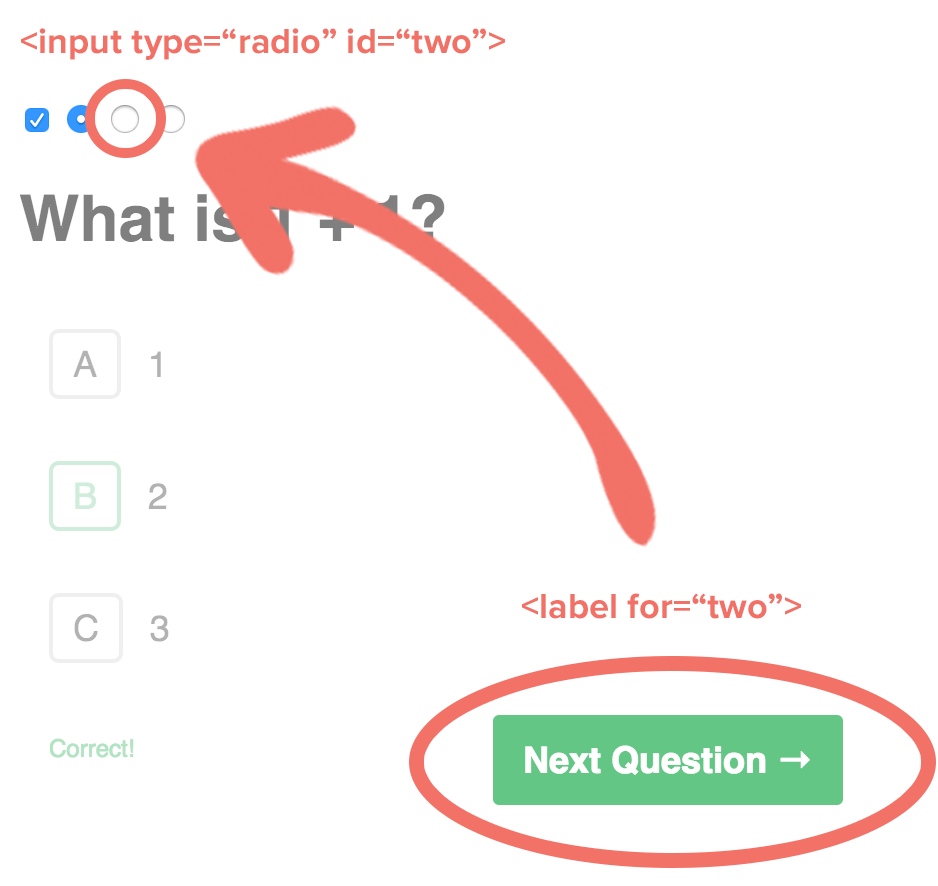
<div class="success">Correct!</div>
<label for="two" class="next">Next Question →</label>
</label>
<div class="error">Wrong =(</div>
</label>
Here we are placing these success or error messages right before the closing </label> of their corresponding answer. Since we are nesting, it essentially follows a reverse order. So, the first closing </label> applies to answer C, the second closing </label> to answer B, and the third closing </label> to answer A.
We’ll want to hide those messages by default:
.error, .success, .next {
    display: none;
}
And only display them when their corresponding radio button is checked:
.wrong:checked ~ .error {
    display: inline-block !important;
}
.correct:checked ~ .success {
    display: inline-block !important;
}
.correct:checked ~ .next {
    display: inline-block !important;
}
We’re essentially saying that when a player chooses:
- A wrong answer, the .wrong radio button is checked and the error message is displayed
- A correct answer, the .correct radio button is checked and the success message is displayed
The success message also has a special <label> of “Next Question” that directs users to move on with the quiz.
<label for="two" class="next">Next Question →</label>The “for” attribute is powerful for interactivity in email because it lets you map items to any input field—even if they are separated from each other in the HTML.
In this example, we’re saying for=”two”, which corresponds to the input with the id=”two”—this is our second “slide” and question in our interactive quiz. In slide “two” and the second question of the quiz, the <label> will be for=”three” to map to the third question of the quiz. Thus, we can map the interaction of an input from inside one slide to change to another slide with the for attribute.
And there you have the content for the HTML of your quiz. You can simply reuse the same structure across all questions and just change the correct/wrong status and messages as needed.
Fallback
Since not all clients support an interactive quiz, we created a fallback image and call-to-action button that linked to a customized web version of the email where users could participate.
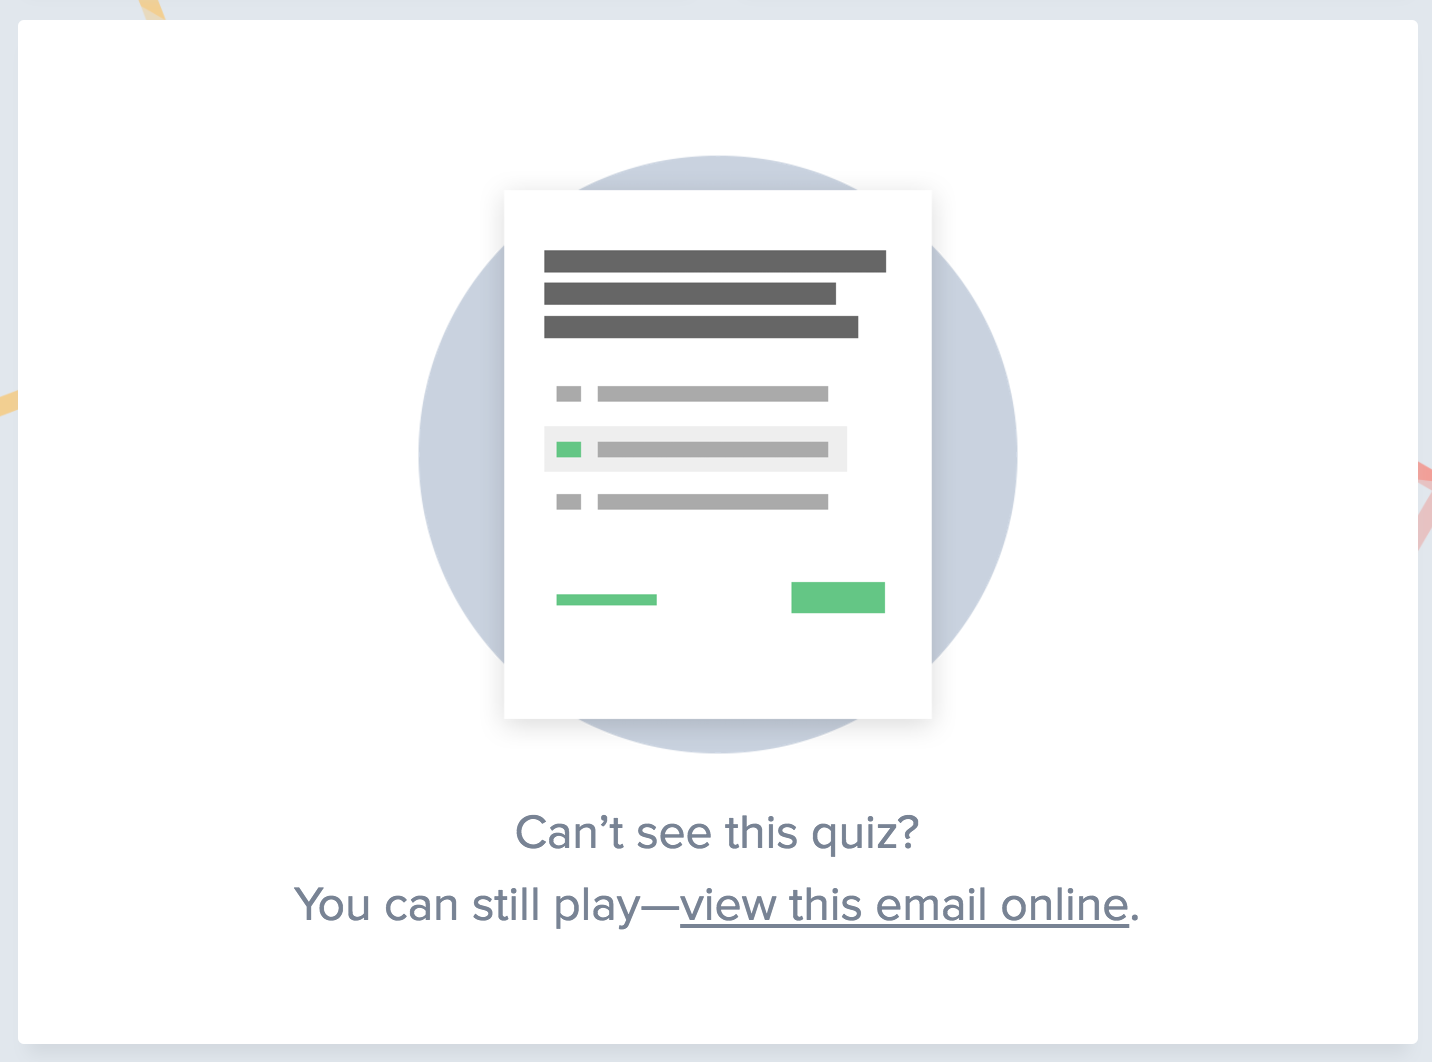
This was shown by default and then hidden for WebKit clients where the quiz was activated:
@media screen and (-webkit-min-device-pixel-ratio: 0) {
  /* Insert CSS here */
}
It was easy to check that the fallback implemented worked across all of the email clients that don’t support interactivity, by using Checklist. See how the email rendered across multiple email clients with varying support for interactivity.
Run a Checklist for every emailPreview your email in 70+ apps and devices, validate that your links, images, and tracking work properly, test your email’s load time, and more–all before pressing send. |
High Social Engagement
It’s important to measure the success of any email campaign. For our interactive email quiz we used Twitter activity as a measure of success for the campaign. The campaign saw around 650 tweets on Twitter with the #LitmusLive hashtag—a huge success for us!
.@litmusapp continually pushing the envelope with email newsletters. #LitmusLivehttps://t.co/hGytikwQPj? pic.twitter.com/nt5k7SfreI
— Seán Smyth (@Sean_Smyth) March 14, 2017
@litmusapp I keep going back to it and finding more cool elements (like the arrows on the Twitter feed section). This is great! #litmuslive
— email snarketing (@EmailSnarketing) March 14, 2017
Hey @litmusapp, CommunityInteraction is a WIN! Learned a ton just by taking part! Cheers to all #emailgeeks! Hope to see you at #LitmusLive
— Elina Sosnovska (@eli_elinasos) March 14, 2017
LOVE LOVE LOVE the quiz format this year, @litmusapp @kllewkow ! #LitmusLive pic.twitter.com/Aioem5YNrB
— McKenzie Gregory (@kenziegreg) March 14, 2017
People! @litmusapp put a quiz in this morning’s #litmuslive email. pic.twitter.com/0Jgh3P8tqs
— Michael J. Barber (@michaeljbarber) March 14, 2017
Explore Email InteractivityIn this 4-page whitepaper, email leaders learn about email interactivity, see examples, and understand its challenges. |
Sharing is caring
You now have everything you need to add an interactive quiz to your next email, and we can’t wait to see how you use it! If you feel like sharing your interactive quiz campaign, head over to the Community. And if you have any questions, let us know—we’re here to help.
The info in this blog is 2+ years old and may not be updated. See something off? Let us know at hello@litmus.com.

Kevin Mandeville was a Product Manager at Litmus
