Surprising. Entertaining. Informative. GIFs are all of these things, and marketers and customers alike love these fun email additions. But you know what else GIFs can be? Big. It’s easy for a GIF file size to grow to bloated, behemoth proportions that interfere with email load times.
So what’s an email marketer to do? Evan Diaz, the Lead Designer at Lucky Red Pixel, has the answers. Here’s what we learned from his Litmus Live presentation, “Creating Animations That Delight and Help Subscribers.”
Tiny but mighty: Why keeping GIF file sizes low is so crucial
Large GIFs lead to slow email loading or downloads that eat up a subscriber’s phone data plan. Both of these can leave subscribers frustrated, which jeopardizes all your hard work and impacts your campaigns’ performance. That’s why keeping GIF file sizes small is one of the key challenges email marketers have to master if they want to use the power of animated GIFs in their email campaigns.
How big can a GIF in email be?
In general, the smaller your GIF is the faster it loads in your emails—and the shorter your load times, the better the experience is for your subscribers. But what’s the maximum file size that’s acceptable for a GIF? Evan advises keeping files under 5 MB. At 5 MB, a subscriber will probably only have to wait a few seconds for images to load. Here at Litmus, we’re trying to keep GIFs under 1 MB to guarantee speedy load times and to not eat up too much of our readers’ data should they open our email on mobile while on the go.
Focus on file size optimization throughout the GIF creation process
Reducing GIF file size starts on the drawing board. Once you have an idea for your GIF, there are some design choices you can make to keep sizes in check. Plus, when it comes to finetuning your GIF in Photoshop and processing it for use in email design tools, there are additional tricks you can utilize to stop your GIFs from becoming too heavy. Here’s the top ten tips for keeping GIF sizes small:
1. Stick to simpler (AKA faster) transitions
If your animation involves transitions, stick to “cuts” over “fades.” Whereas cuts jump right from one visual to the next, fades take their time to deliver the same message. Fades involve more frames, more colors, and thus come with larger file sizes. The example below shows how significant the impact of a fade transition is on file size. If you choose a fade effect over a simple cut transition, your GIF file is 7.8 times larger.
Not a fan of cut transitions? Evan suggests using a “translate” transition, where one frame slides over the previous image. This way, you get interesting movement without bogging down the file with more color transitions from a fade.
2. Use illustrations over photos when possible
In the same way that processing more colors in a fade transition increases GIF file size, so too do the complex colors in photographs. Illustrations will have more solid-color components than a photo or video, which typically makes them less heavy.
It uses a lot of colors, so the impact on file size is huge.
Another benefit of simply-colored illustrations is that you can incorporate more movement and animation with a smaller file size footprint. Subtle changes in a photograph are more cumbersome to load than multiple animated frames for an illustration that tells a story. If there’s no way around using a photograph, then you should isolate the animated portion. Instead of the entire image being a GIF, you can significantly decrease the file size by leaving all non-moving sections as images.
3. Overlay colors to limit the color palette in photographs
Another way to bring down the file size when you need to use a photo or an embed video in email is to overlay a single color on the GIF. A monochrome overlay gives the GIF an on-brand tint and limits the number of different colors the GIF needs to process. The result: smaller file sizes!
4. When turning a video into a GIF, import every other frame to a layer
Photoshop will convert your video frames to layers when you select File > Import > Video Frames to Layers. This is a handy tool, but it can lead to a runaway GIF file size if you aren’t careful.
Optimize your file size by limiting layers to every 2 frames. This option will take every other frame to create layers, which reduces file size. If taking the layers down to every other frame isn’t enough, Evan noted that having Photoshop only pick up one out of every 4 frames is still a good place to start.

5. Delete duplicate frames
Remember: The more frames you use in your GIF, the bigger the file size. After importing your GIF to Photoshop, you can look at the animation frame-by-frame. If there are multiple layers with the same frame image, give the duplicates the boot.
Here at Litmus, we often use EZGIF to optimize our animated GIFs. The free online GIF optimizer gives you the option to easily delete duplicate frames if you don’t have access to Photoshop or a similar tool.
6. If you remove duplicate frames, adjust delay to keep GIF on pace
If you’re removing frames from your GIF, you’ll need to change the frame delay to keep GIF timing the same. Simply “hold” the single frame for equivalent of time it would have taken to run through the duplicate frames you’ve deleted—that’s how you keep the GIF on pace.
Keep in mind that there’s a simple inverse relationship in GIFs: the higher the frames per second, the less jerkiness in playback. A delay of .03 will likely be the default Photoshop gives your uploaded GIF, which creates a 30 FPS animation that loads very smoothly. But the more frames you need to load per second, the larger your file size will be. You’ll want to find the sweet spot that keeps your animation smooth enough while keeping your file size low.
7. Choose adaptive color reduction
When you save your GIF for the web, you’ll be met with a few options for color reduction. Evan’s best practice suggestion is “adaptive” color reduction. This algorithm samples colors that appear most in an image and provides a fair balance between file size and color fidelity.
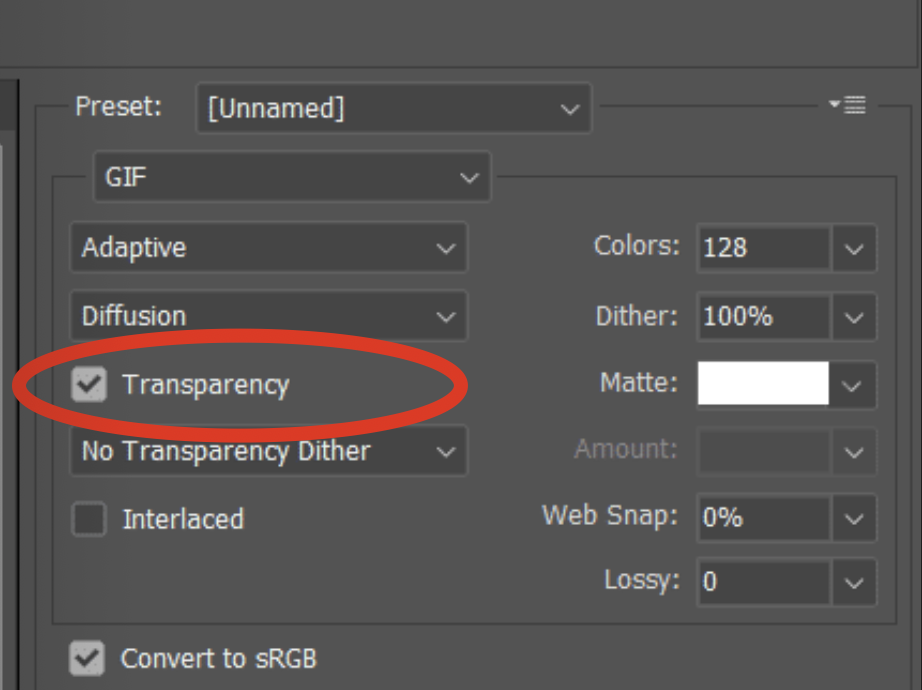
8. Keep “transparency” turned on
GIFs often handle transparently poorly, applying a harsh white edge around elements when set on a transparent background. If you’d like to use animations on a transparent background, animated PNGs are the way to go. So what does that “transparency” checkbox in Photoshop actually do? It allows pixels that didn’t change from frame to frame to remain as they are. That means that areas on the GIF that remain constant from one frame to the next don’t need to bother reloading. Evan suggests leaving this turned on most of the time, as it can reduce your file size by a third or more.
9. Balance the color table with dither
During export, you also have the option to adjust the number of colors saved to the image file’s color table. The lower the number of colors, the smaller the file size. To get the best combination of optimized file size to color fidelity, choose:
- 128-256 colors for videos
- 64-128 colors for animated illustrations
If you want to really fine-tune your file size, you can combine your color table changes with the dither percentage. A higher dither percentage leads to smoother gradients, even with a limited color table. For example, a greyscale with only 8 color stripes becomes a smooth gradient with 100% dither turned on. A higher dither combined with a color table on the lower end for videos just might be the sweet spot for a GIF that looks nice yet loads quickly.
10. Simply reduce video quality and file size with Lossy
Want to optimize your GIF file size without all the fine tweaking involved in color tables and dither? Selecting a Lossy level of 20% to 40% reduces file size, and some quality, in one fell swoop. You can play around with these percentages to find the balance of quality and file size that’s right for you.
Watch Evan’s full Litmus Live talk
Are you looking for even more tips on how to create animations that delight and help subscribers? You can watch Evan’s full Litmus Live talk below!
What’s your secret to optimizing animated GIFs for email?
Great GIFs can add context and fun to an email, while a GIF gone bad can distract from the message or cause subscribers to avoid your emails altogether. What are your tricks to optimizing animated GIFs for email? We’d love to hear them in the comments below!
The info in this blog is 2+ years old and may not be updated. See something off? Let us know at hello@litmus.com.

Steph Knapp is a Freelance Content Writer for SaaS and B2B companies.
