Your email service provider (ESP) is essential to your email marketing workflow. Without it, you wouldn’t have a way to deliver the messages you work so hard to strategize, design, and test to your audience. While your relationship with your ESP can change over time, leaving one to move to another is bound to be an emotional time.
Whether you can’t wait to make the switch or you’re overwhelmed by what lies ahead, this guide will walk you through:
- What is ESP migration?
- Why it’s important to plan your move carefully
- An 8-step ESP migration checklist
- Tips to warm up your new IP
What is ESP migration?
ESP migration is the process of changing email providers and moving your email marketing program, automations, and data to a new platform. This guide focuses on moving your email program to a new email service provider ESP after you have a new account, not the process of choosing a new ESP.
Why having a carefully planned ESP migration is important
Moving your entire email program around is stressful (“What if I accidentally and irreparably delete everything?!”), but there’s plenty of good that can come out of the process.
Here’s why you need to have a migration plan in place.
Keep communication lines open
Imagine your ESP migration is like the baton hand-off at a relay race—you want it to be fast and smooth. A successful ESP migration doesn’t create any lapses in your email program, especially around timely messages like transactional emails.
A well-planned move also supports internal communication. For example, if the product team needs to promote a launch, you don’t want to hold up their schedule with migration delays.
Safeguard data integrity
Your ESP migration will handle large amounts of data, some of which is your subscriber’s personal and contact info. Your goal is to maintain data encryption and access controls during the move, which means sensitive data shouldn’t hang out on your desktop in an unprotected document.
Organization is another data integrity component during your ESP migration. You don’t want to accidentally delete subscribers, mix up audience segments, or scramble data formatting.
Preserve brand consistency
Your new ESP will have a learning curve, but you want to work out any issues in the testing phase so subscribers don’t receive broken or duplicate emails.
Sustain email deliverability
Another quality you want to uphold from one ESP to the next is deliverability so that your messages don’t suddenly go to spam.
Optimize cost-efficiency
ESPs are an investment for your email team; you don’t want to pay for multiple for too long. You also don’t want to start paying for your new ESP too far in advance, but you need to avoid rushing the migration process. Decisions, decisions.
Four steps for a smoother email workflow!
Join the experts in efficiency and email with this insider’s guide to sending better emails, faster.
Follow this ESP migration checklist for a smooth move
ESP migrations admittedly involve many moving parts–but following these important steps can make your migration process as smooth and headache-free as possible.
1. Prioritize projects before the migration
You may not have the luxury of quickly moving everything from one ESP to another between sends, so you need to work in batches. Set some priorities (and add them to your email audit document) on what you need to migrate throughout a specific timeline.
Consider the need to keep automation and email nurturing running and avoid customers or subscribers from getting duplicate emails or getting totally left out and not receiving anything.
The prioritization and planning phase is also a great time to consider how you’ll measure your ESP migration ROI.
2. Create an email audit document
Organization, planning, and communication will give you a vastly better migration experience than ad-libbing. Use an email audit document (you can copy ours here) to list out details and migration priorities for your:
- Segments
- Lists
- Email programs
- Emails
3. Make the most of your blank slate
Migrating to a new ESP gives you a blank slate. You can remedy all (or at least most of) of those organizational annoyances you had in your previous ESP!
Take some time to think about how you want to organize and set up your new ESP. This will be highly dependent on the ESP you’re migrating to, but consider elements like:
- Naming convention. A good naming convention can make it easier and faster to find what you’re looking for in your new ESP. This includes naming conventions for emails, templates, programs, campaigns, and even email lists.
- Folder structure. How do you want to organize your new ESP? If your new ESP allows for a folder structure—use it. Options include creating folders for specific campaigns or years, with sub-folders for months. Just be careful that you don’t create a never-ending folder tree,
- Automations. If you need to clean up segmentation or delete outdated steps in an automation, now is your chance to do it. With everything else on your team’s plate during an ESP migration it isn’t the time to overhaul your automation strategy, but you can at least prioritize and organize your email flows.
4. Set realistic deadlines aligned to priorities
The timeline for your ESP migration depends on many variables, from the complexity of your email program to the differences between your old and new tool and how many people are involved. You can use three months as a starting point for an expected timeline and then adjust as needed. Don’t forget to share deadlines with your migration team to ensure structure and feel like you’re progressing.
“Brands want it done quickly and often set unrealistic expectations internally on how quickly it can be done. They also overlook just how much time it takes to coordinate everything if they are doing it themselves.” – Andrew Kordek, former Chief Strategist & Co-founder at Trendline Interactive
5. Leverage available tools
Your tech stack can come in very handy during a migration. Are there tools you already use that could be helpful? We leveraged Litmus’s ESP integration to migrate our email templates from Litmus to our new ESP with the click of a button. This automation saved the email team hours of copying and pasting email code.
6. Use your ESP’s customer support team
When thinking of “resources” to help you migrate easily, you often think of internal resources, like the people on your team and the tools you use.
But consider the support team at your new ESP a valuable resource in this process, too. They have the expertise to help you as you start out in your new ESP.
You’re going to have an abundance of questions—they can help answer them for you. Before you start migrating, get in touch with the support team and ask if they have any tips or documentation on migration best practices.
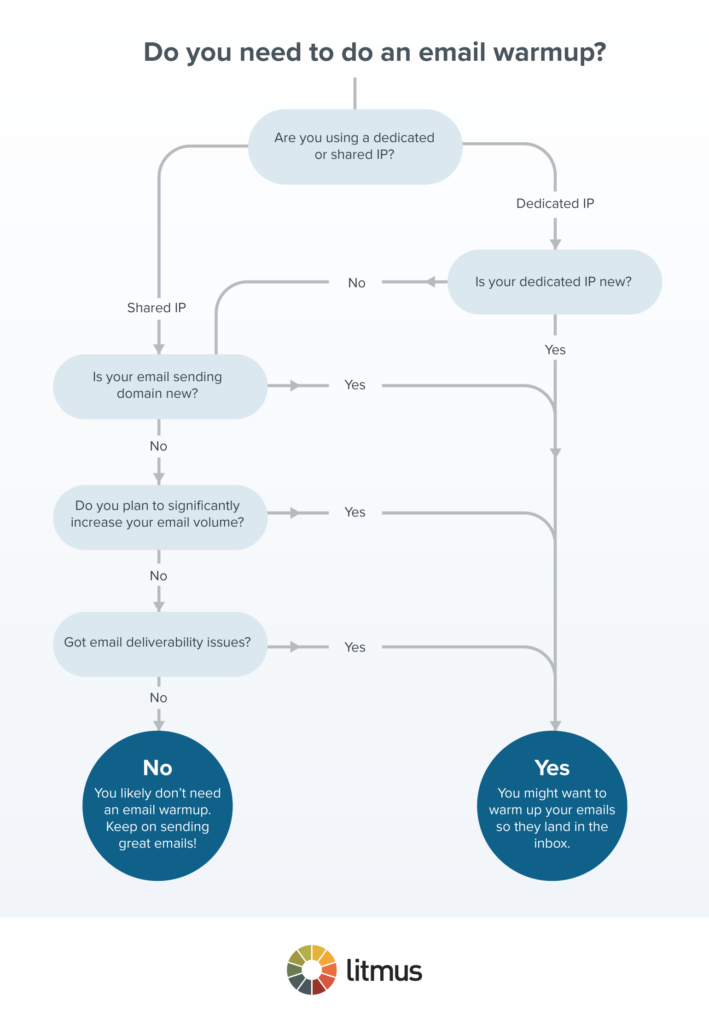
7. Create an IP warming plan
To make sure you can get up and running in your new ESP quickly and start sending emails as soon as possible, you need to warm your new IP address. (Hint: This is only applicable if you are on a dedicated IP address.)
Here’s a quick guide to whether you should implement an email warmup plan:
8. Test as you go
It’s easy to get sucked into creating new programs, lists, rules, segments, and email templates in a new ESP… and forget to test each as you go.
Your new ESP may behave differently than your previous one, so it’s important to test everything you create in your new ESP as you go. Does that new automation work as you expected? The email template you just uploaded—does this new ESP change your code in any unexpected way?
You’ll save yourself a lot of time (and heartache!) if you iteratively test as you create in your new ESP.
Automate your email testing to stick to your ESP migration schedule.
Litmus email testing speeds up your email review process without leaving any stones unturned in your ESP migration.
Tips to help warm your new IP
When you migrate to a new ESP, you’ll be on a new sending IP address that is considered “cold.” When an inbox service provider (ISP) suddenly starts receiving large volumes of email from a “cold” IP address, they will begin evaluating the traffic coming from the IP.
Email volume is a key indicator for ISPs when understanding which emails are spam or not. If you come in too hot—high volume, low email engagement—ISPs will deliver your emails to the spam folder. This is why you need to warm up your new IP address.
To warm up your new IP address, start with a small volume of sends and gradually increase over time.
Find your most engaged audience
You want to put your best foot forward in your new ESP on your new IP address and your most engaged subscribers can help with that.
ISPs look at how and if your email recipients engage with your emails to understand if your emails are spam. It’s ideal to send to your top subscribers to warm up your new IP address because they are actively engaging. And that’s the indicator ISPs are looking for in genuine email senders.
Start with your best-performing emails
Along with your most engaged audience, you want to warm up your IP address with your top email performers. These could be high-performing newsletters or automated/triggered emails.
It’s easier to establish a good reputation on your new IP address than to repair a bad sender reputation. So be sure to plan your IP warming accordingly. And don’t forget to reach out to your ESP’s support team—they may be able to provide you with help and guidance on IP warming.
Slowly build volume
The key to successfully warming an IP address is a gradual increase in volume over time while continually monitoring email performance. Start by sending a small volume to your most engaged audience on your new IP address. The next week, send to a slightly bigger audience.
At Litmus, we warmed our IP address over the course of 5 weeks, gradually sending to larger audiences each week.
It’s important to monitor each message. Don’t panic if you observe any drops in email engagement. Adjust the volume for your next send to be slightly smaller, monitor, rinse, repeat!
Decide if moving to a new ESP is right for you
Before you plan and implement an ESP migration, you want to be sure you’re ready for the move and choose the right ESP for your needs. ESP questions you need to consider include:
- How fast can I launch a campaign?
- Is it meeting my business goals?
- Can I collaborate easily with my team?
Whether you’re in the early stages of your ESP hunt or ready to make your move, our ESP Migration Guide has tips and templates for your team.
Start planning your ESP migration today!
Your guide to making a move to a new email service provider (ESP) as easy as possible, including templates, resources, and our favorite strategies for success.

Jaina Mistry was the Director of Brand and Content Marketing at Litmus.
